
After filming the Marilyn Monroe dresser from last week , I wanted to create something simple, because frankly I was tired, last week’s project was twice the work I had planned on. so I vowed to do a quick project this week so I could get caught up on all of the other things on my to-do list.
My plan did not work out… this project was another detailed, idea that took lots of time. Heavy sigh… as I write this I’m making another vow, that next week’s video will be simple, easy, and quick but still fun!
I do have to say that I’m super excited about this project, Every time I create a new video my hope is that you will be so inspired that you actually go out, round up the supplies and make it yourself. (or something similar to it).
I make holiday wreaths, every year to sell in my store, I’ve made them out of seashells, branches, butterflies, paper, glitter. you name it, but I’ve never made a wreath from wood and paint. I looked on Pinterest and I couldn’t anything like what was in my head… and so began the recycled shutter wreath adventure…
In this video I show you…
-how to layer paint colors to get a weathered driftwood effect.
-how to distress with a damp cloth instead of sandpaper
-how to use aging dust in combo with clear wax
-how to tranfer graphics to wood with freezer paper
and, how to bend wood veneer into the shape of a bow!
that’s a lot of tricks all in a five minute video!
Here’s some tips that will make your process easier if you decide to make something like this,
– when using freezer paper to transfer graphics, it really helps if you cut the freezer paper precisely to an 8.5 x 11 sheet otherwise your printer will jam up.
– be careful after you print out your image, the ink does not sink into the paper and if you touch it, it is very easy to smudge it and ruin the design.
-after you transfer the image onto your piece of wood let it dry thoroughly, the ink takes a good 24 hours to completely dry and it is easy to smudge it at this point as well.
-try to download a coupon from Michael’s before purchasing the ultra thin sheet of wood to create the ribbon, it’s a bit pricey but not so bad with 50% off.
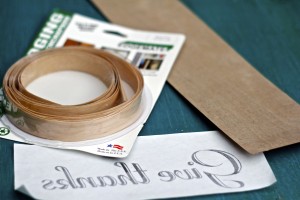
Michael’s sell sheets in various thicknesses and sizes in the model section of the store I purchased the thinnest type.
-Make sure your wood sheet has soaked long enough before you try to shape it, it also helps if you relax the wood with your fingers under the water until you are confident that it is pliable enough to bend into shape.
I only soaked my sheet for about 30 minutes because I was on a schedule filming and not that patient. I would suggest waiting longer than this, but keep a good eye on it as you don’t want it to to curl up and become waterlogged.
The cabinet tape was purchased at Home Depot you can get quite a bit of it for about eight dollars. The tape has an adhesive backing that’s activated with a hot iron, I cut two strips to size and adhered both pieces together back-to-back with the iron. I used my heat gun to reactivate the glue and shape my bow as shown in the video.
the video also shows me painting the strips before I shaped the bow, if I were to do it again I would have painted it afterwards as the paint cracks a little as you bend the wood and apply heat to it.
This project has a lot of steps but it’s pretty easy and fun to do!
If you decide to make something similar please send me a photo so I can post it to my Facebook page!
I’m racking my brain, thinking about other things I can do with this super cool cabinet tape, what else do you think could be done with it?
I love the holidays, I like to say it’s the craftiest time of the year!
There are so many fun classes I have lined up for this season, we will be teaching some beautiful ornament classes, as well as furniture painting and a lot more! look for our new class schedule posting this weekend!

don’t miss my Mermaid Ornament Class, it’s gonna fill up fast!

Sincerely,
Debi
Deb, Your wreath is absolutely darling. How do you come up with all your ideas?
Spotted this on CraftGawker and had to come check it out. Such a classy wreath! Thanks for the tutorial.
This is really beautiful! Hopefully you’ll enjoy it for years to come since it was more work than you anticipated!
I Like a lot your projects and you are an inspiration to work always with a smile 🙂
From Salzburg, Austria, an argentine (I´m from Argentina) girl doing things with her hands!
Love,
Mechi